2018 年秋,我选修了《Linux 原理与应用》这门课程。在课程中,老师布置了几项作业,让我们从中选择一项完成。我选择了搭建直播服务器这项作业。在完成作业的过程中,我通过查找资料,学习到了 Linux、直播技术、服务器等方面的许多知识,并使用两种方法分别完成了任务。
我使用的是配置了 MSYS2 环境的 Windows 10 操作系统,并使用 Oracle VM VirtualBox 虚拟机安装了 Linux openSUSE 操作系统。
我计划完成的具体内容如下:
经过查找资料,我发现:直播协议可以选择 RTMP 或 HLS,但 RTMP 是 Adobe 的私有协议,无法直接在很多设备上播放1。经过考虑,我选择了 HLS 协议。但实际上,在配置 Nginx 服务器时,仍要在 RTMP 协议的基础上进行配置2。
主机:FFmpeg, Mozilla Firefox(或其他浏览器)
虚拟机:libpcre, OpenSSL, zlib
由于我已经在虚拟机中安装过 libpcre 和 zlib,因此这两个程序不需要额外安装;另外,在 openSUSE 系统中,OpenSSL 可以使用 zypper install libopenssl-devel 安装3。
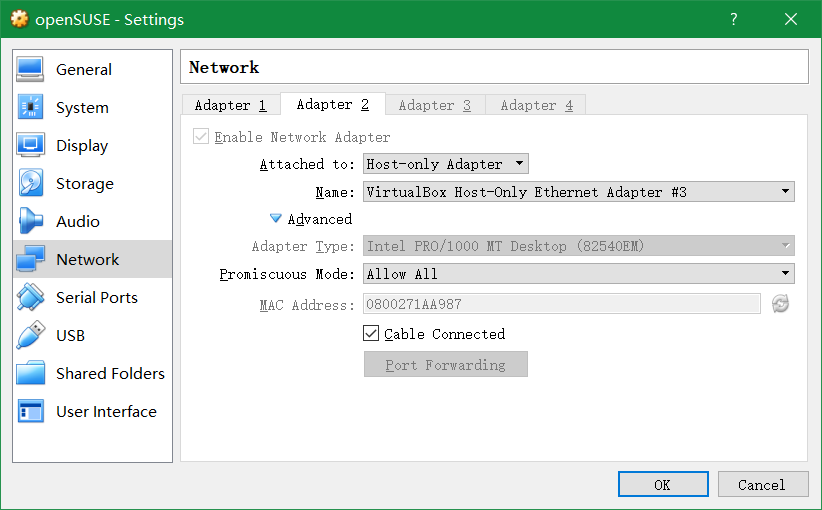
在 Windows 操作系统上,使用 ipconfig 命令查看网络信息,得到与虚拟机相关的网卡 Ethernet adapter VirtualBox Host-Only Network #3 的 IP 地址为 192.168.56.1,子网掩码为 255.255.255.0。
根据以上信息,可以在 Oracle VM VirtualBox 中对虚拟机进行如下配置4:
同时,需要在 Linux 中手动配置网络。我将 IP 地址设置为 192.168.56.9,子网掩码设置为 255.255.255.0,这是为了与主机在同一子网中;另外,将网络设备设置开机时即启用,避免手动开启设备。
使用如下命令编译和安装 Nginx5:
cd ~
wget http://nginx.org/download/nginx-1.15.5.tar.gz
wget https://github.com/sergey-dryabzhinsky/nginx-rtmp-module/archive/dev.zip
tar -zxvf nginx-1.15.5.tar.gz
unzip dev.zip
cd nginx-1.15.1
CC=clang ./configure --with-http_ssl_module --add-module=../nginx-rtmp-module-dev
make -j8
sudo make install
最初在使用 configure 命令时,没有指定 CC=clang,系统默认的编译器为 GCC 8.2.1,出现了一些编译错误,使得编译失败。我还没有能力通过解决修改源代码的方式解决这些错误,但是想到该错误可能与编译器有关,于是指定 CC=clang,将编译器改为 Clang 6.0.1,成功编译。
make 命令的 -j8 参数是使用 8 线程编译,以加快编译速度。
打开 /usr/local/nginx/conf/nginx.conf。
修改 http -> server 块中的 server_name6
修改前:
server_name localhost;修改后:
server_name localhost 192.168.56.9 192.168.56.1;在 http -> server 块中加入如下内容7
location /hls {
    # Disable cache
    add_header Cache-Control no-cache;

    # CORS setup
    add_header 'Access-Control-Allow-Origin' '*' always;
    add_header 'Access-Control-Expose-Headers' 'Content-Length';

    # allow CORS preflight requests
    if ($request_method = 'OPTIONS') {
        add_header 'Access-Control-Allow-Origin' '*';
        add_header 'Access-Control-Max-Age' 1728000;
        add_header 'Content-Type' 'text/plain charset=UTF-8';
        add_header 'Content-Length' 0;
        return 204;
    }

    types {
        application/vnd.apple.mpegurl m3u8;
        video/mp2t ts;
    }

    root /tmp/;
    add_header Cache-Control no-cache;
}rtmp {
server {
listen 1935;
chunk_size 4096;
application live {
live on;
record off;
hls on;
hls_path /tmp/hls;
hls_fragment 3;
hls_playlist_length 20;
}
}
}使用如下命令运行 Nginx 服务器10
sudo /usr/local/nginx/sbin/nginx备注:修改了 Nginx 的配置文件后,重新加载配置文件的命令是 sudo /usr/local/nginx/sbin/nginx -s reload。
关闭防火墙11
sudo iptables -F起初没有在 Linux 中关闭防火墙,结果使用主机可以 ping 通虚拟机,但程序无法正常通信。
设视频文件的存储位置是 /g/share/streams/24599937/1/24599937_1_0.flv。
在 Bash 环境中输入如下命令:
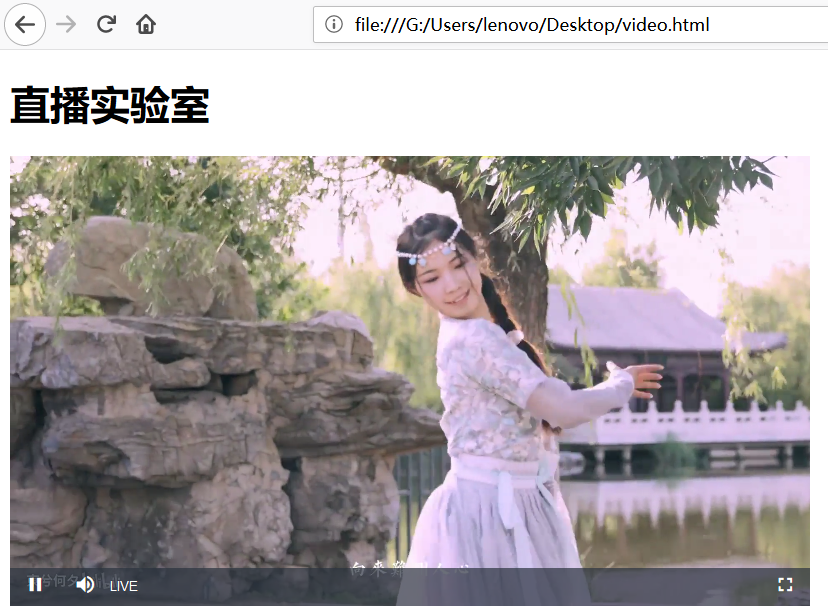
ffmpeg -re -i '/g/share/streams/24599937/1/24599937_1_0.flv' -vcodec libx264 -vprofile baseline -acodec aac -strict -2 -f flv rtmp://192.168.56.9:1935/live/live新建文件 video.html,输入如下内容:
<!DOCTYPE html>
<html lang="zh-CN">
<head>
  <meta charset="utf-8" />
  <title>直播实验室</title>
  <script src="https://unpkg.com/video.js/dist/video.min.js"></script>
  <link href="https://unpkg.com/video.js/dist/video-js.min.css" rel="stylesheet" />
</head>
<body>
  <h1>直播实验室</h1>
  <video class="video-js" controls autoplay="true" width="640" data-setup="{}">
    <source src="http://192.168.56.9:8080/hls/live.m3u8" type="application/vnd.apple.mpegurl" />
  </video>
</body>
</html>
使用 Mozilla Firefox 浏览器中打开该文件,即可查看视频。
其中,视频的播放由 Video.js 完成。
视频成功播放。
在成功搭建上述直播服务器后,我经过思考,认为轮播服务器对我更加实用。
在原来的直播服务器中,有三种角色:主播、服务器端和观众;而轮播服务器中,只有服务器端和观众两种角色,服务器端预先存储固定的几个视频并循环播放,用户观看视频时如同直播一样,不能在视频流上移动。这样做使用的是直播协议,可以模拟直播间的效果,而且可以精心挑选想要播放的视频,使用服务器持续播放。
为了实现这样的轮播服务器,我参考了直播协议 RFC 821612。直播时,客户端会不断请求 *.m3u8 文件,检查列表中是否有新的 *.ts 视频切片。经过学习后1314151617,我决定使用 Haskell 实现轮播服务器。
我计划完成的具体内容如下:
*.flv 格式的视频切片,转换为 *.ts 格式的视频和播放列表文件 playlist.m3u8playlist.m3u8 文件,并通过文件中提供的 URI 向服务器请求视频片段本地:FFmpeg
个人服务器:Stack
设有两个视频文件,存储的位置分别是 /g/share/streams/30088402/1/30088402_1_0.flv 和 /g/share/streams/24599937/1/24599937_1_0.flv。
mkdir 30088402
ffmpeg -i /g/share/streams/30088402/1/30088402_1_0.flv -c copy -map 0 -f segment -segment_list 30088402/playlist.m3u8 -segment_time 10 30088402/output%03d.ts
mkdir 24599937
ffmpeg -i /g/share/streams/24599937/1/24599937_1_0.flv -c copy -map 0 -f segment -segment_list 24599937/playlist.m3u8 -segment_time 10 24599937/output%03d.ts执行上述命令后18,会在当前文件夹下产生如下文件:
.
├───24599937
│       output000.ts
│       output001.ts
|       ...
│       output024.ts
│       playlist.m3u8
│
└───30088402
        output000.ts
        output001.ts
        ...
        output020.ts
playlist.m3u8服务器的大致原理如下:
服务器使用 Haskell 语言中的 Yesod Web 框架实现。Haskell 语言具有语法简洁的特点,最终的源代码仅有 183 行。
我经过查找资料发现,虽然有许多人与我一样实现了简单的 HLS 服务器,但是多数使用的是 Python 等编程语言,尚无人使用 Haskell 实现 HLS 服务器。本次实验可以视作在此方面的一次尝试。
将切片后生成的文件放置在个人服务器的 prista/hls 目录中(可以自行定义),同时在 src/Main.hs 中,设置 readAndMergePlayListFiles 函数的参数为 "prista/hls"。
使用 Stack 编译和运行服务器。典型的运行方式如下:
stack build
stack exec -- hls-simple使用同样的方法请求个人服务器根目录的 playlist.m3u8 文件,获得正确的播放列表:
EXTM3U
EXT-X-VERSION:3
EXT-X-MEDIA-SEQUENCE:19
EXT-X-TARGETDURATION:19
EXTINF:7.6,
prista/hls/24599937/output019.ts
EXTINF:8.9,
prista/hls/24599937/output020.ts
EXTINF:11.1,
prista/hls/24599937/output021.ts
EXTINF:10.65,
prista/hls/24599937/output022.ts
EXTINF:7.0,
prista/hls/24599937/output023.ts
EXTINF:4.65,
prista/hls/24599937/output024.ts
EXT-X-DISCONTINUITY
EXTINF:11.832,
prista/hls/30088402/output000.ts
EXTINF:14.291,
prista/hls/30088402/output001.ts
EXTINF:7.832,
prista/hls/30088402/output002.ts
EXTINF:8.374,
prista/hls/30088402/output003.ts
EXTINF:10.374,
prista/hls/30088402/output004.ts
EXTINF:9.999,
prista/hls/30088402/output005.ts
EXTINF:9.999,
prista/hls/30088402/output006.ts
EXTINF:9.999,
prista/hls/30088402/output007.ts
EXTINF:7.999,
prista/hls/30088402/output008.ts
EXTINF:9.999,
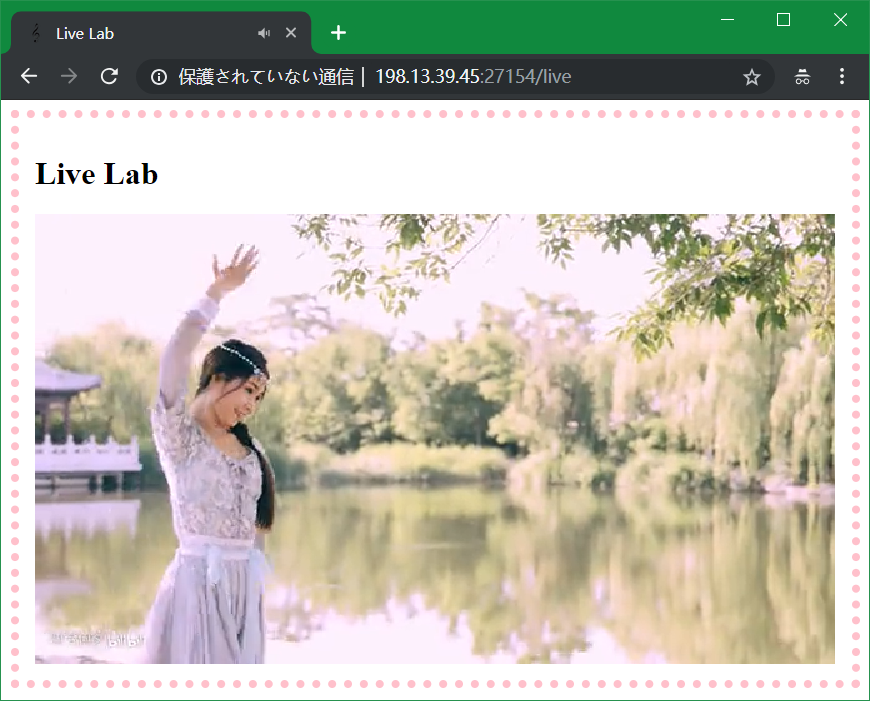
prista/hls/30088402/output009.ts在电脑浏览器中,视频文件正常播放:
在手机浏览器中,视频文件也能正常播放:

Zac波. RTMP HLS HTTP 直播协议一次看个够[EB/OL]. https://www.jianshu.com/p/4c89b2c83e59.↩︎
dodgepong. How to set up your own private RTMP server using nginx[EB/OL]. https://obsproject.com/forum/resources/how-to-set-up-your-own-private-rtmp-server-using-nginx.50/.↩︎
xinwenfei. opensuse下遭遇openssl/aes.h: No such file or directory解决办法[EB/OL]. https://blog.csdn.net/xinwenfei/article/details/50777289.↩︎
风吹过的时光. VirtualBox Host-only理解与实践[EB/OL]. https://blog.csdn.net/hzhsan/article/details/45224371.↩︎
dodgepong. How to set up your own private RTMP server using nginx[EB/OL]. https://obsproject.com/forum/resources/how-to-set-up-your-own-private-rtmp-server-using-nginx.50/.↩︎
cuishiying. 搭建HLS直播测试环境[EB/OL]. https://blog.csdn.net/cuishiying/article/details/78579108.↩︎
cuishiying. 搭建HLS直播测试环境[EB/OL]. https://blog.csdn.net/cuishiying/article/details/78579108.↩︎
cuishiying. 搭建HLS直播测试环境[EB/OL]. https://blog.csdn.net/cuishiying/article/details/78579108.↩︎
nginx-rtmp-module. Directives[EB/OL]. https://github.com/arut/nginx-rtmp-module/wiki/Directives.↩︎
dodgepong. How to set up your own private RTMP server using nginx[EB/OL]. https://obsproject.com/forum/resources/how-to-set-up-your-own-private-rtmp-server-using-nginx.50/.↩︎
davids_3233. [nginx] 在 Linux 服务器上部署 nginx 之后不能访问[EB/OL]. https://blog.csdn.net/lipeigang1109/article/details/73295373.↩︎
RFC 8216, HTTP Live Streaming[S]. R. Pantos, Ed., W. May, 2017.↩︎
RFC 8216, HTTP Live Streaming[S]. R. Pantos, Ed., W. May, 2017.↩︎
lucpp. [原创]直播服务器简单实现 http_flv和hls 内网直播桌面[EB/OL]. http://www.cnblogs.com/luconsole/p/6079534.html.↩︎
xiaojun11-. HLS实现点播和直播时,M3U8文件的不同[EB/OL]. https://blog.csdn.net/xiaojun111111/article/details/52102454.↩︎
Apple Developer Documentation. Live Playlist (Sliding Window) Construction[EB/OL]. https://developer.apple.com/documentation/http_live_streaming/example_playlists_for_http_live_streaming/live_playlist_sliding_window_construction.↩︎
Michael Snoyman. Developing Web Apps with Haskell and Yesod[M]. 2nd Edition. O’Reilly, 2015.↩︎
Jerry_Insist. 利用ffmepg把ts文件转m3u8并切片[EB/OL]. https://blog.csdn.net/zhangjiarui130/article/details/51691221.↩︎